How to Wire High Bay LED Lights?
In modern commercial and industrial environments, high bay LED lights have become a popular lighting choice. Not only do they offer efficient lighting solutions, but they also boast long lifespans and energy efficiency. However, proper installation and wiring of high bay LED lights are crucial to ensure their smooth operation and safety. This article will provide a detailed step-by-step guide on how to correctly wire high bay LED lights.

Step 1: Confirm Power SupplyType
The first step involves confirming the type of voltage needed for the high bay LED lights. Consider that most LED lights take either 120V or 277V power supply, but some accessories might need a different kind. Read the documentation of the LED high bay light to find out the exact voltage requirements.
Step 2: Prepare Work Area
As with all installations, it is critical to show the electricity off first to save you everybody from being greatly surprised. Detach all required device which includes screw drivers, cord cutters, cord connectors, and heavy duty tape.
The current needs for fixtures must be known in order to choose the right circuit breaker for high bay LED lights. Given the input voltage range of 120 to 277 volts, you can certainly determine the amperage drawn per light with the following formula:
To derive the amps:
Amperage (amps) = Wattage (w) / Voltage (v)
Let’s say your voltage is one hundred twenty volts.
Then for each 100-watt light, the desired current may be 0.83 amps. This way that in case you put up 8 of these furnishings, the overall modern-day will attain 6.Sixty seven amps.
Additionally, for the sake of safety, a more conservative approach can be adopted when choosing a circuit breaker which is normally set at 80% of the approved rating. Therefore if a 15 amp circuit breaker is being used, leave a load of up to 12 amps. Similarly with a 20 amp breaker, load up to 16 amps for safety.draw 0.83 amps of current. Therefore, if
you install 8 such fixtures, the total current draw will be 6.67 amps.
It's typically recommended to use 80% of the rated amperage when selecting a circuit breaker to ensure safety. For example, if you choose to use a 15-amp circuit breaker, it's advisable to only use a load of 12 amps.Similarly, if you select a 20-amp circuit breaker, it's recommended to only use a load of 16 amps.
Step 3: Connect Power Lines
Depending on the type of power that the LED lights require, make the appropriate power line connections. Use a standard 120V power supply: black wire (hot) plugs into one terminal and white wire (neutral) into the other, within the electric box. For a 277V power supply, connect the black wire (hot) to one terminal and the gray wire (neutral) to the other within the electric box.
Step 4: Connect Ground Wire
In the electrical box, connect the green grounding wire or bare copper wire to the grounding point. This is required in order to ensure that the electrical circuit is adequately earthed for safety.

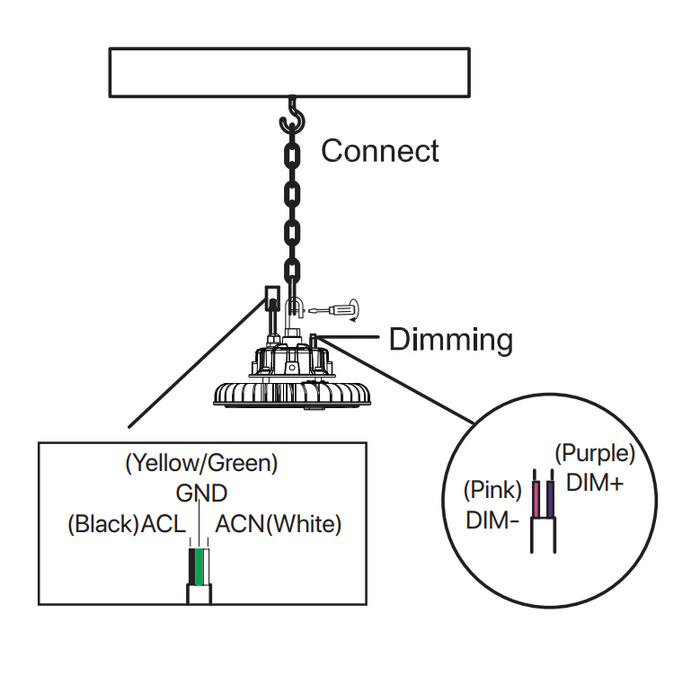
If the lights have to be dimmed for whatever purpose, kindly use our range of dimmers or this type of dimmer:
LEVITON DS710
LUTRON DVSTV/DVTV
COOPER SF10P
HUBBELLLHD-IRS3-N-WH
https://hi-hyperlite.com/products/0-10v-dimmer
There are two regular ways of
installation.
First one:
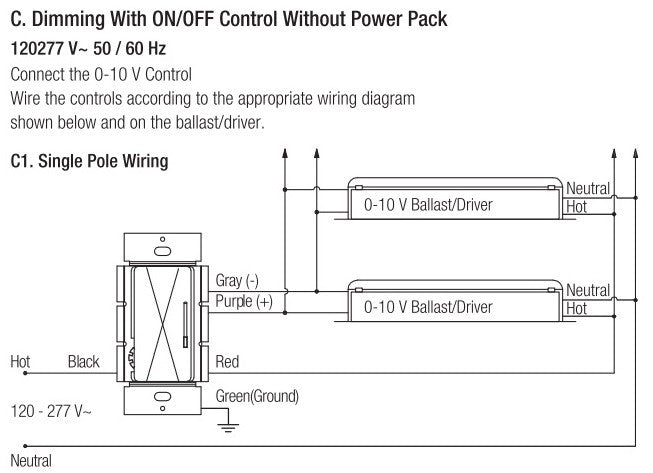

Always remember to follow the instructions for installation that come with your LED light. Usually, this means that the power lines of the fixtures are connected to the proper circuits in the electrical box. Insulation with electric tape is done afterwards.
Second way:
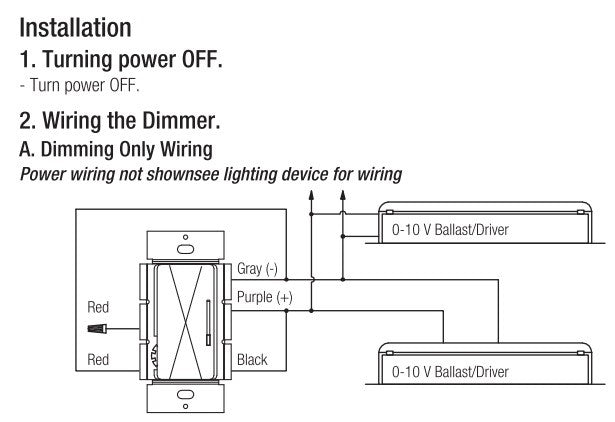

In this way the dimmer doesn't serve as a switch, lights will not be turned off completely, because our power is 1-10v instead of 0-10v, even if the dimmer is at its lowest value,the light will be slight, but you can connect around 16 lights.
Step 5: Connect Light Fixtures
Always remember to follow the instructions for installation that come with your LED light. Usually, this means that the power lines of the fixtures are connected to the proper circuits in the electrical box. Insulation with electric tape is done afterwards.
Step 6: Install Light Fixtures
The ceiling light fixtures are to be placed on the ceiling. The light fixtures should be firmly attached to the ceiling.
Step 7: Test and Debug
Make sure that everything is secure and properly connected before re-energizing. Switch the lights on and check if they work, if not make any necessary adjustments.
Ensuring smooth operation and safe use of high bay LED lights is all about proper wiring. The above described guide lays out everything needed for easy installation and wiring of high bay LED lights. Remember to always switch off power source to avoid hazards during electrical work.
Hyperlite High Bay LED Lights for Commercial and Industrial.
LED Lighting Innovators. Superior performance, quality, and value. Our fixtures are ultra efficient, ultra durable, and able to illuminate any space. Experience the difference with Hyperlite today!