
Imagine walking into your garage on a Saturday morning. You’ve got a project lined up—maybe a classic car that needs detailing or a woodworking piece that requires precision. But as you flip the switch, the single, flickering bulb in the center of the ceiling casts long, frustrating shadows over everything you need to see. We’ve all been there. It’s the "cave effect," and it’s the number one enemy of a productive workspace.
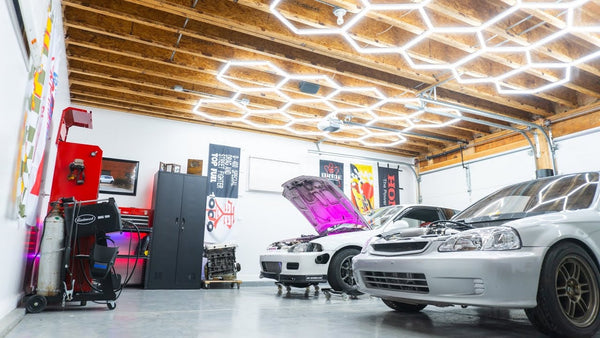
Hexagon lighting kits have exploded in popularity because they don’t just look like something out of a high-end automotive showroom; they solve the shadow problem by distributing light from multiple angles simultaneously. However, the most common mistake we see isn't choosing the wrong light—it's choosing the wrong amount of light. Buy too little, and you still have dark corners; buy too much without a plan, and you might find yourself tripping a circuit breaker or dealing with a messy install.
In this guide, we’re going to walk you through exactly how to plan your hexagon layout for 1-car and 2-car garages, ensuring you get that edge-to-edge glow without the headache of over-purchasing.
Measuring Your Space: The "Buffer Zone" Rule
Before you even look at kit sizes, you need to know your "lighting footprint." This isn't just the total square footage of your garage; it’s the usable ceiling space.
When we audit garage setups, we look for obstructions first. Garage door tracks, openers, and overhead storage racks are "dead zones" for hexagon grids. A common pro tip we use is the 12-inch Buffer Rule: maintain at least 12 inches of clearance between your light grid and any wall or major obstruction. This prevents the light from "washing out" against the wall and ensures the connectors are easy to snap together during installation.
How to Measure Like a Pro
- Length and Width: Measure the open ceiling area, excluding the garage door's path when open.
- Ceiling Height: This is critical. According to the IES LM-79-19 standard, which governs how we measure light output, the distance from the light source to the work surface significantly affects perceived brightness.
- The Painter’s Tape Trick: Once you have your measurements, we highly recommend using blue painter’s tape to mock up the hexagon grid on the ceiling. It sounds tedious, but it reveals spacing issues—like a light bar ending up right on top of a junction box—that a tape measure might miss.
The 1-Car Garage: Single Grid vs. Full Perimeter
A standard 1-car garage in North America is typically around 12 feet wide by 20 feet deep. In a space this size, you have two primary strategies.
The Centered Focal Point
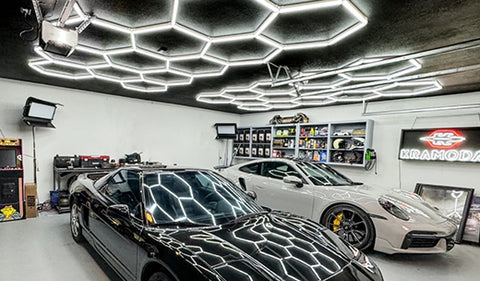
For most 1-car setups, a single large hexagon grid centered over the vehicle is the gold standard. This provides intense task lighting for the hood and roof of the car. However, if you have a workbench at the back of the garage, a centered grid might leave you working in your own shadow. In this case, we suggest shifting the grid 2 feet toward the workbench side.
The Perimeter Approach
If your garage doubles as a gym or a multi-purpose hobby room, you might prefer a "stretched" layout. By using a kit that covers more linear feet but with fewer internal "cells," you can spread the light closer to the walls. This is particularly useful if you have wall-mounted tool storage.
| Garage Type | Typical Dimensions | Recommended Strategy | Impact |
|---|---|---|---|
| Standard 1-Car | 12' x 20' | Single 14-Grid or 15-Grid | High-intensity task lighting for one vehicle. |
| Small Shop | 10' x 18' | Single 5-Grid or 1-Grid | Compact, focused light for detail work. |
The 2-Car Garage: Avoiding the "Tunnel Effect"
This is where planning becomes vital. A standard 2-car garage is usually 20' x 20' or 24' x 24'. The biggest mistake we see is homeowners buying one massive kit and centering it in the middle of the ceiling.
This creates the Tunnel Effect: the center of the garage is blindingly bright, but the areas where you actually do work—the sides of the cars and the workbenches along the walls—remain in the dark.
The "Two-Zone" Strategy
Instead of one giant grid, we almost always recommend creating two distinct lighting zones—one over each parking bay. This provides uniform, task-friendly illumination.
Why Two Zones are Better:
- Uniformity: You get light on both sides of both vehicles.
- Control: You can wire them to separate switches. If you’re only working in one bay, why power the whole ceiling?
- Ease of Install: Smaller grids are much easier to manage and align than one massive 20-foot structure.
The Electrical "Gotchas": Breakers and Daisy Chains
Hexagon lights are incredibly efficient, but when you start tiling hundreds of tubes together, the math changes. We recently ran a simulation for a 24' x 24' garage with a high-density grid. The results were eye-opening.
The NEC 80% Rule
According to the National Electrical Code (NEC), a circuit breaker should only be loaded to 80% of its capacity for "continuous loads" (lights that stay on for more than 3 hours).
- A standard 15A breaker handles 1,440W at 80%.
- A dense, full-coverage grid for a 2-car garage can easily exceed 2,000W.
If you try to run a massive 2-car grid on a single 15A circuit that also powers your garage door opener and a space heater, you will trip the breaker. For large setups, we recommend a dedicated 20A circuit or splitting the grid across two separate power injection points.
The 62-Tube Limit
Every cable has its limits. In our experience, exceeding 62 tubes on a single power cable leads to a noticeable drop in brightness at the far end of the run (voltage drop). If your plan requires 100 tubes, you must use at least two power injection points distributed evenly. This ensures every hexagon glows with the same intensity.
High Ceilings and the "Lumen Gap"
Does your garage have 12-foot or 14-foot ceilings? If so, standard calculations won't work. Light follows the inverse-square law: as you double the distance from the light, the intensity drops to one-fourth.
In garages with ceilings over 12 feet, the perceived brightness on your workbench drops significantly. Our rule of thumb for high ceilings is to add 30-40% more lumens than you think you need. This usually means choosing a kit one size larger or opting for a denser grid pattern to compensate for the height.
Safety and Durability Standards
When choosing your kit, look for safety certifications. Standards like UL 1598 ensure the fixtures are built to handle the electrical and thermal stresses of a garage environment. For workshops where dust or moisture might be an issue, we also look for an IP65 rating, which indicates the lights are protected against dust ingress and low-pressure water jets.

Pre-Installation Checklist: Don't Drill Yet!
Before you start climbing the ladder, run through this checklist to ensure a smooth afternoon of DIY.
- Mockup: Is your painter’s tape grid centered? Does it clear the garage door tracks?
- Power Source: Is there a nearby outlet or junction box? If you're hardwiring, remember that UL 8750 standards apply to the LED drivers and power supplies.
- Surface Prep: If you’re using the screw-mount method, locate your ceiling joists. If you’re using the suspension method, ensure your anchor points are secure.
- The "Snap" Test: Before mounting a whole row, snap two tubes together to get a feel for the connector tension. They should be firm but not forced.
Common Questions (FAQ)
How many kits do I need for a standard 2-car garage? In most cases, two medium-sized kits (one for each bay) provide the best balance of light coverage and electrical safety. This avoids the "tunnel effect" and allows for independent switching.
Can I connect different kit sizes together? Generally, yes, as long as they use the same connector type and you stay under the 62-tube limit per power cord. Always check the total wattage to ensure you aren't overloading your circuit.
What color temperature (CCT) is best for a garage? Most users prefer 5000K (Daylight White). It provides the best contrast for mechanical work and detailing. According to the American Lighting Association (ALA), 5000K is the industry standard for task-heavy environments like workshops.
My lights are flickering. What’s wrong? Flickering is often a sign of a loose connection at one of the Y-connectors or an overloaded circuit. Ensure all tubes are fully seated in their connectors. If the problem persists, it may be a compatibility issue with a dimmer switch; most hexagon kits are designed for standard on/off switches only.
Summary of Planning Logic
Planning your hexagon layout is a balance of aesthetics, task requirements, and electrical reality. By following the "Two-Zone" strategy for 2-car garages and respecting the 62-tube power limit, you create a space that isn't just "cool" to look at, but is genuinely safer and more functional.
Remember, the goal isn't just to fill the ceiling with hexagons—it's to put the right amount of light exactly where your hands are working.
Disclaimer: Electrical work involves risks of fire and shock. The information provided in this article is for informational purposes only. Always consult with a licensed electrician and follow the National Electrical Code (NEC) and local building codes before performing any electrical installations or modifications in your home.